Azure API Management
Azure API Management (APIM) is a service that simplifies the publishing of HTTP APIs, by decoupling internal backend services from external endpoints. Technically, it is a reverse-proxy that sits between the clients and the backend services, so the http connection is terminated at the APIM service, which then forwards the request to the backend service opening a new http connection. It is also important to note that APIM is a regional service, deployed in a specific Azure region. It is not a global service like Azure Front Door.
APIM can proxy backend API hosted in Azure but even hosted on third-party services, such as AWS or GCP. It can also proxy APIs hosted on-premises, as long as the APIM service can reach the backend service over the network.

Configuration
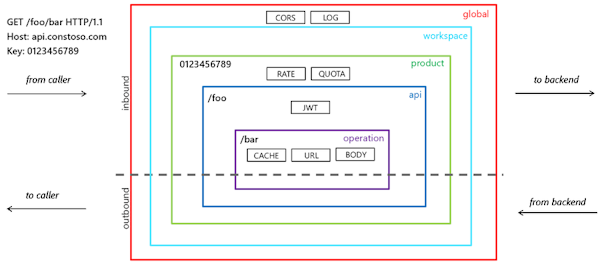
The key element in the configuration it the “API”. It is a set of http endpoints, typically with the same backend service. Under an API, there are “Operations”, which are the specific http endpoints that clients call.
Example:
API: "MyTest"
     APIM base url: https://fake.azure-api.net/mytest/
     Operations:
     - GET /users --> URL: https://fake.azure-api.net/mytest/users
     - POST /users --> URL: https://fake.azure-api.net/mytest/users
     - GET /cars --> URL: https://fake.azure-api.net/mytest/cars
     - ...
If not modified using policies, the automatic mapping of external URL to backend URL is as follows:
[------------1------------][--2--][---3---]      [-----------------4----------------][---5---]
https://fake.azure-api.net/mytest/customers  --> https://mybackend.example.com/a/b/c/customers

1 : APIM base URL
2 : API name
3 : Operation name
4 : Backend base URL
5 : Operation name, copied from #3
The API and every operations have associated policies to instruct APIM how to handle the requests and responses. Policies can be applied at different scopes, and are merged together at runtime:
- global
- api
- operation
If you have trouble understanding and debugging the mapping, you can temporarily add this policy:
<outbound>
    <base />
    <set-header name="DebugInfo" exists-action="override">
        <value>@{return context.Request.OriginalUrl.ToString() + " --> " + context.Request.Url.ToString();}</value>
    </set-header>
</outbound>
Output example:
DebugInfo: https://fake.azure-api.net/mytest/customers --> https://mybackend.example.com/a/b/c/customers
Custom domains
It is possible to assign a custom domain to the APIM service, so that the clients can call the API using a custom domain instead of the default Azure domain ending in .azure-api.net. Azure can create and assign a free https certificate.
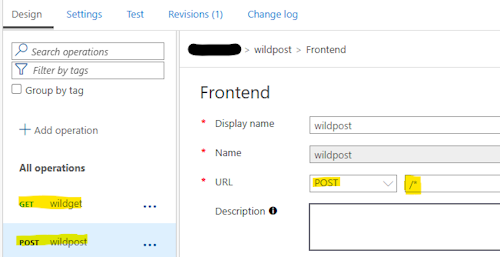
Wildcard operations
APIM supports wildcard operations, which can be used to match multiple operations with a single policy. This is useful when you want to apply the same policy to multiple operations without having to define it for each one individually. Official documentation only mentions the use of ‘*’ with GET method but POST works, too. ⚠ As stated by documentation “use care when configuring a wildcard operation. This configuration may make an API more vulnerable”.
 >
>
Pointing to backend
The backend service called by APIM can be configured in different ways:
- setting the URL at API level: select the API –> Settings –> Fill the “Web service URL”. If not overridden, this will be the base URL for all operations in the API.
- setting the URL at API or Operation level, using the policy
set-backend-servicein the<inbound>:<inbound> <base /> <set-backend-service base-url="https://mybackend.example.com/" /> </inbound> - defining a “backend” and then reference it in the API or Operation policy. To define a backend, go to section “Backends”, create a new backend, assign a basic url and optional credentials, like API-key to access backend api.
  <inbound>
    <base />
    <set-backend-service backend-id="mybackend1" />
  </inbound>
We can also partially change the backend URI using rewrite-uri policy. E.g.:
api:       abc
operation: /isalive
   <inbound>
      <base />
      <rewrite-uri template="/123/fake" />
      <set-backend-service base-url="https://mybackend/back/" />
   </inbound>

Result: https://apim.xxxxxxxx/abc/isalive --> https://mybackend/back/123/fake
Authentication
We can secure and protect the API using Microsoft Entra ID. The calling app obtains a valid AccessToken (JWT) and on APIM we must verify the incoming JWT.
The validation can be done using the <validate-jwt> policy, at API level or at single
operation level (normally the former).
Example:
<inbound>
    <base />
    <validate-jwt header-name="Authorization" failed-validation-httpcode="401"
                  failed-validation-error-message="Unauthorized" require-expiration-time="true"
                  require-scheme="Bearer" require-signed-tokens="true">
        <openid-config url="https://login.microsoftonline.com/...MY-TENANT-ID.../v2.0/.well-known/openid-configuration" />
        <issuers>
            <issuer>https://sts.windows.net/...MY-TENANT-ID.../</issuer>
        </issuers>
        <required-claims>
            <claim name="aud">
                <value>api://2bd181...guid...</value>
            </claim>
            <claim name="scp" match="any">
                <value>scope1</value>
                <value>scope2</value>
            </claim>
        </required-claims>
    </validate-jwt>
</inbound>
The Authorizationheader is passed to the backend service. If you want you can remove it, extract information
from it, change the header name, etc. Example below: extract email, change header name and remove the original.
    <inbound>
        <base />
        <validate-jwt>
           ...
        </validate-jwt>
        <set-header name="MYHEADER-EMAIL" exists-action="override">
            <value>@{
              var jwt = context.Request.Headers.GetValueOrDefault("Authorization").AsJwt();
              return jwt?.Claims.GetValueOrDefault("email") ?? "unknown";
            }</value>
        </set-header>
        <set-header name="MYHEADER-JWT" exists-action="override">
            <value>@{
              return context.Request.Headers.GetValueOrDefault("Authorization");
            }</value>
        </set-header>
        <set-header name="Authorization" exists-action="delete" />
    </inbound>
Application Insights ang Log Analytics
- Application Insights is supported on all tiers.
- Log Analytics is not supported on Consumption (despite the fact that Analytics voce is available under Monitoring).
- as usual, Application Insights can correlate items from different AppInsights instance.
- If you see calls like
/status-0123456789abcdefthey are probably caused by Application Insights availability checks, automatically created when you linked App Insights instance to APIM. To remove or change it, find the check under Application Insights / Investigate/ Availability.
Suggestions and final notes
- Use backend definition whenever possible:
- create an API, leaving “Web service URL” empty.
-
in the global API policy (select “All operations”) set the backend service in
inbound/set-backend-service:<inbound> <base /> <set-backend-service backend-id="mybackend1" /> </inbound>
- Avoid using automatic import of api. The manual way give you more control and understanding of what is happening under the hood.
- At least on Consumption plan (not sure on others) there no way to export the configuration of the exposed APIs.
Useful links
- https://learn.microsoft.com/en-us/azure/api-management/api-management-howto-policies
- https://learn.microsoft.com/en-us/azure/api-management/api-management-policy-expressions