How to assign a domain name and activate HTTPS on a Free or Shared Azure web site - [Experiment]
[Warning: the highlighted solution is not production-ready. It’s only an experiment!!!]
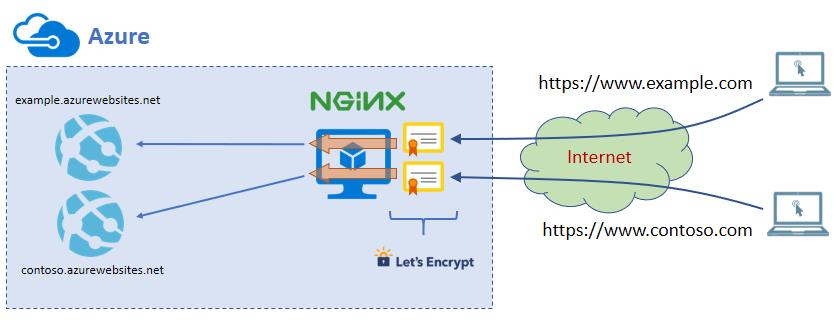
Azure Free Web Site are great for low traffic site but have too many limitations. In particular, you cannot assign a custom hostname under your domain (mysite.example.com) and cannot assign a certificate for activating https. The upper level, the Shared tier, has more CPU power and memory, allows to assign a custom hostname but HTTPS cannot be activated. The full features start with the Standard tier.
If you want to expose one or more Free or Shared web sites on a custom hostnames and through HTTPS, there is a solution: create a small Linux virtual machine, install NGINX, run it as a reverse proxy and “map” a web site ti a different hostname and assign an SSL certificates from Let’s Encrypt.
For my tests, I used a A0-Basic Virtual machine (1 core, 0.75 GB RAM)
Setup the DNS
After installing the Ubuntu 16.10 virtual machine, point your hostname DNS entry to the hostname assigned to the virtual machine. Use a “CNAME record” on your DNS:
CNAME record: www.example.com --> mylinuxvm.westeurope.cloudapp.azure.com
Install NGINX on Ubuntu 16.10

The installation of NGINX is very fast and easy:
sudo apt update
sudo apt-get install nginx
Now NGINX is installed and running. To verify the installation:
sudo nginx -v
## Basic NGINX setup
Before configuring NGINX, create a self-signed SSL certificate to assign as default certificate to the default server (enter the required information using dummy values like “myserver”, “myorg”, etc.):
sudo openssl req -x509 -nodes -days 365 -newkey rsa:2048 -keyout /etc/ssl/private/nginx-selfsigned.key -out /etc/ssl/certs/nginx-selfsigned.crt
NGINX configuration can be done with different approaches. The simpler is to edit directly the default configuration file:
cd /etc/nginx/sites-enabled
sudo nano default
Use the following “server” section to create a default web site listening on port 80 and 443:
# ---- DEFAULT ----
server {
        listen 80 default_server;
        listen [::]:80 default_server;
        listen 443 ssl default_server;
        listen [::]:443 ssl default_server;
        ssl_certificate     /etc/ssl/certs/nginx-selfsigned.crt;
        ssl_certificate_key /etc/ssl/private/nginx-selfsigned.key;
        ssl_protocols       TLSv1 TLSv1.1 TLSv1.2;
        ssl_ciphers         HIGH:!aNULL:!MD5;
        root /var/www/html;
        index index.html index.htm index.nginx-debian.html;
        server_name _;
        location / {
            try_files $uri $uri/ =404;
        }
}
After editing the configuration file, let NGINX to reload it:
sudo nginx -s reload
Setup the reverse-proxy
NGINX comes with powerful reverse-proxy capability. With few lines, it’s possible to setup reverse proxy, mapping a hostname with an existing web site. The example below maps http://www.example.com to https://mysite.azurewebsites.net. The section location /.well-known is required by Let’s Encrypt client (see the following paragraph).
# ---- MY_SITE_1 ----
server {
    server_name www.example.com;
    listen 80;
    root /var/www/html;
    index index.html index.htm;
    location /.well-known {
       try_files $uri $uri/ =404;
    }
    location / {
       proxy_set_header X-Real-IP $remote_addr;
       proxy_set_header X-Forwarded-For $proxy_add_x_forwarded_for;
       proxy_pass https://mysite.azurewebsites.net/;
    }
}
Get the Let’s Encrypt certificate

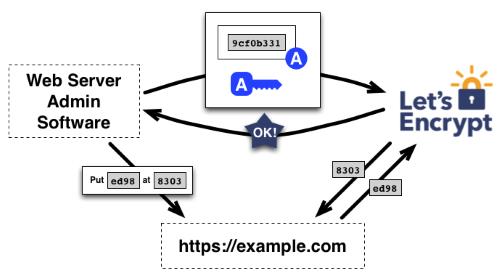
Let’s Encrypt is a free and automated certification authority. It is a service provided by the Internet Security Research Group (ISRG). It is designed to release free digital certificates to allow HTTPS on websites. Under the typical use, the process is fully automated. Details here: https://letsencrypt.org/how-it-works/
First of all, install the “ACME client”, certbot on Ubuntu:
sudo apt-get install certbot
Run certbot to create the certificate. This creates the certificate for the hostname www.example.com:
sudo certbot certonly --webroot -w /var/www/html -d www.example.com
If certbot runs correctly, the certificate and the related private key, will be placed under /etc/letsencrypt/live/www.example.com/: cert.pem, chain.pem, fullchain.pem and privkey.pem
Important: Let’s Encrypt certificates expire after 3 month. It’s important to remember to renew them before the expiration. This can be easily done using the same client used to create the certificate.
sudo certbot renew
The installer of certbot also install an automatic task that runs every night and will try to renew all certificates on the machine. Details: https://certbot.eff.org/
Assign the certificate to NGINX
Edit the NGINX configuration file again and in the server section of the proxy-reversed site, assign the just created certificate:
# ---- MY_SITE_1 ----
server {
  server_name www.example.com;
  listen 80;
  listen 443 ssl;
  ssl_certificate     /etc/letsencrypt/live/www.example.com/fullchain.pem;
  ssl_certificate_key /etc/letsencrypt/live/www.example.com/privkey.pem;
  ssl_protocols       TLSv1 TLSv1.1 TLSv1.2;
  ssl_ciphers         HIGH:!aNULL:!MD5;
  root /var/www/html;
  index index.html index.htm;
  location /.well-known {
     try_files $uri $uri/ =404;
  }
  location / {
     proxy_set_header X-Real-IP $remote_addr;
     proxy_set_header X-Forwarded-For $proxy_add_x_forwarded_for;
     proxy_pass https://mysite.azurewebsites.net/;
  }
}
Drawbacks and conclusions
You can repeat the highlighted steps for every site you want to publish on a custom hostname and over HTTPS. But… there are also drawbacks to be considered:
- You have to manage a full Linux instance by yourself: setup, hardening, update, etc.
- Sometime reverse-proxies are not so transparent for web application.
- You are adding a component in the chain that could fail.